
FIRST LOOK: SIGMA 20MM F1.4 DG DN | ART LENS FOR ASTROPHOTOGRAPHY
Sep 03, 2022
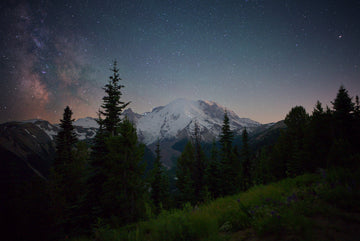
There’s a lot to consider before hitting your shutter to take a photo of the stars. Location planning starts with finding an area with dark skies and as little light pollution as possible. Composition planning under those dark skies requires something interesting and compelling to both draw and hold attention. Those compositional elements then need to align with celestial objects that, although they appear to be moving slowly across the sky, are often in position for just a few minutes.
From here, the pre-planning list involves timing the Moon phase, checking every weather forecasting app, consuming enough coffee to stay awake, and making sure you have the right gear to bring all your planning from concept to reality.
It may sound like a lot of work, but it can be incredibly rewarding when everything goes as planned. To make sure that’s the case as often as possible, I’m constantly looking at ways to improve each step of the process.
So, when I had the opportunity to start planning images that I would take new SIGMA 20mm F1.4 DG DN | Art, I couldn’t wait for everything to align. I had the locations picked out, the pins dropped, and offline maps ready to go.
First Impressions of the 20mm F1.4 DG DN | Art
When the 20mm F1.4 DG DN | Art arrived at my door, the first thing I noticed was the size and build. It has every characteristic I’ve come to expect in terms of high quality from the SIGMA Art line, while coming in at a smaller-than-expected footprint.
The lens allows for 82mm screw-on front filters, as well as a rear filter holder for soft or gel filters at the base of the lens. Both options are great for attaching filters to enhance star glow, minimize light pollution, or for the astrophotographer that happens to stay awake long enough, to see and photograph sunrises with a neutral density (ND) filter.
On my first night with the 20mm F1.4 DG DN | Art, I began the same way I test every new lens. I take a look at my maximum exposure time, set my ISO, and start taking test images at F2.8 and slowly work my way to wide open (F1.4 in this case). With each image, I take a moment to review and answer the question that every astrophotographer will be asking. How do the stars in the corners look?